Spring AOP 와 Self Invocation 은 무슨 관계가 있는걸까?
— Spring, Spring AOP, Proxy, Issue — 7 min read
Spring AOP 와 Self-Invocation 의 관계
들어가기에 앞서
Self-Invocation 은 Spring AOP 동작 방식과 밀접한 연관이 있고, Spring AOP 는 보통 Cache, Transaction 을 사용할 때, 이용하게 된다.
대표적인 두 사례에서 발생하는 Self-invocation 에 대해서 알아보고, 이 문제가 발생하는 이유를 Spring AOP 의 동작 방식을 통해 이해해보고,
이를 해결하기 위한 방법들에 대해 알아보자.
Our Goals
- Self-invocation 의 발생 원인 이해
- 해결 방안
1. 발생 예시 - Transaction
예제 코드
@Servicepublic class SelfInvocationService { public SelfInvocationService(SelfInvocationRepository selfInvocationRepository) { this.selfInvocationRepository = selfInvocationRepository; }
private final SelfInvocationRepository selfInvocationRepository;
public void callApplyTransaction() { applyTransaction(); }
@Transactional public void applyTransaction() { SelfInvocation selfInvocation = new SelfInvocation(); selfInvocationRepository.save(selfInvocation);
System.out.println(selfInvocation.getId()); }}테스트 코드
@SpringBootTestclass SelfInvocationApplicationTests { @Autowired private SelfInvocationService selfInvocationService;
@Test void transaction_self_invocation_test() { selfInvocationService.callApplyTransaction(); selfInvocationService.applyTransaction(); }}결과
DEBUG 45279 --- [ Test worker] o.s.orm.jpa.JpaTransactionManager : Creating new transaction with name [org.springframework.data.jpa.repository.support.SimpleJpaRepository.save]: PROPAGATION_REQUIRED,ISOLATION_DEFAULTDEBUG 45279 --- [ Test worker] o.s.orm.jpa.JpaTransactionManager : Creating new transaction with name [com.self.invocation.SelfInvocationService.applyTransaction]: PROPAGATION_REQUIRED,ISOLATION_DEFAULT분명 이러한 코드를 실행하였을 때, 기대하는 결과는 applyTransaction 메서드에서 새로운 Transaction 이 만들어지는 것이다.
하지만 결과에는 Self Invocation 상황인 callApplyTransaction 메서드를 실행하면 SimpleJpaRepository.save 메서드에서 Transaction 이 생성 된 것으로 나왔고,
직접 applyTransaction 메서드를 호출하면 기대하던 결과와 같이 applyTransaction 메서드에서 Transaction 이 생성되는 것을 확인할 수 있다.
2. 발생 예시 - Cache
Cache 의 경우에도 위의 Transaction 사례와 비슷한 문제가 발생한다.
예제 코드
@Servicepublic class SelfInvocationService { public SelfInvocationService(SelfInvocationRepository selfInvocationRepository) { this.selfInvocationRepository = selfInvocationRepository; } public void callApplyCache() { applyCache(); }
@Cacheable(cacheNames = "example") public String applyCache() { String caching = "caching"; System.out.println("--- processing ---"); return caching; }}테스트 코드
@SpringBootTestclass SelfInvocationApplicationTests { @Autowired private SelfInvocationService selfInvocationService;
@Test void cache_self_invocation_test() { selfInvocationService.applyCache(); selfInvocationService.applyCache(); selfInvocationService.callApplyCache(); }}결과
--- processing ------ processing ---여기서도 원하는 결과는 applyCache 에서 출력하는 --- processing --- 이 한번만 나타나는 것이다. 하지만 결과에는 두 번 나오게 되었다.
이는 Self Invcation 상황인 callApplyCache 메서드를 호출하였을 때, Cache 가 동작하지 않기 때문이다.
왜 의도한 대로 결과가 나오지 않는 것일까? 답은 프록시를 기반으로 하는 Spring AOP 의 동작 방식과 관련에 있다.
3. 원인
위의 두 사례에서 Spring AOP 의 동작에 의해 메소드 호출 시 프록시 객체가 Transaction 과 Cache 에 맞는 부가적인 기능을 해당 메서드 호출 전 앞 뒤에 ��실행하게 되는데, 이 때 해당 메서드를 호출하는 주체는 프록시 객체이지만, 그 안에서 다시 호출되는 메서드의 주체는 그 메서드를 갖고 있는 객체가 된다.
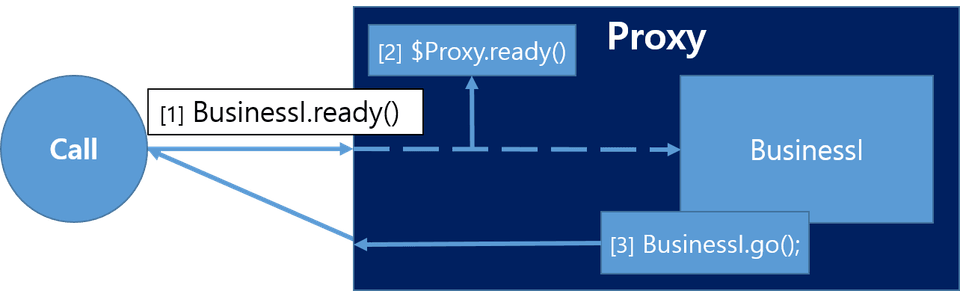 위의 그림을 보면
 BusinessI.ready 를 call 하면 프록시 객체를 참조하게 되어 $Proxy.ready 가 call 되고 그 다음 다시 BusinessI
타겟 객체를 참조하게 되는 것을 알 수 있다. 그 다음 BusinessI.ready 에서 call 하는 BusinessI.go 메서드는 BusinessI 에 의한 것이다.
4. 해결 방안
- AopContext 로 프록시 적용
- Self Injection
- AspectJ Weaving
이렇게 세 가지가 있는데, 본 글에서는 간단하게 적용할 수 있는 Self Injection 과 AopContext 를 이용하는 사례만 알아보고 AspectJ Weaving 에 대해서는 자세하게 다루는 글을 따로 작성하려고 한다.
4.1. AopContext 로 프록시 적용
Spring AOP 에서는 해당 객체를 감싸고 있는 프록시 객체를 반환하는 AopContext 의 currentProxy() 메서드를 제공하고 있는데
이를 이용하는 방식이다.
@Servicepublic class SelfInvocationService { public SelfInvocationService(SelfInvocationRepository selfInvocationRepository) { this.selfInvocationRepository = selfInvocationRepository; }
private final SelfInvocationRepository selfInvocationRepository;
public void callApplyTransaction() {
//applyTransaction();
((SelfInvocationService) AopContext.currentProxy()).applyTransaction(); }
@Transactional public void applyTransaction() { SelfInvocation selfInvocation = new SelfInvocation(); selfInvocationRepository.save(selfInvocation); }}이렇게 하게 되면 callApplyTransaction 를 호출 할 때 applyTransaction 도 프록시 객체로 실행되게 된다.
하지만 이 방법은 expose-proxy 옵션을 true 로 설정해주어야 한다.
이 설정을 하기 위해서는 XML 을 이용하는 방법, ProxyFactory 객체의 ExposeProxy 옵션을 설정해 주는 것, Annotation 을 활용하는 방법이 있는데
본 글에서는 Spring Boot 환경을 사용하므로 간단하게 Annotation 을 사용하는 방법만 살펴 보려고 한다.
설정 방법은 아래와 같다.
@EnableAspectJAutoProxy(exposeProxy = true)@Configurationpublic class AspectJConfig {
}4.2. Self Injection
Bean Container 에서 SelfInvcationService 자신을 다시 주입 받아, 해당 메서드를 호출하는 방식이다.
이때 주의할 점은 생성자 주입 방식이 아닌 @Autowired Annotation 을 통해 주입 받아야 한다는 점이다.
@Servicepublic class SelfInvocationService { public SelfInvocationService(SelfInvocationRepository selfInvocationRepository) { this.selfInvocationRepository = selfInvocationRepository; }
private final SelfInvocationRepository selfInvocationRepository;
@Autowired private SelfInvocationService self;
public void callApplyTransaction() {
// applyTransaction();
// ((SelfInvocationService) AopContext.currentProxy()).applyTransaction(); self.applyTransaction(); }
@Transactional public void applyTransaction() { SelfInvocation selfInvocation = new SelfInvocation(); selfInvocationRepository.save(selfInvocation); }}마치며
본 글에서는 Spring AOP 를 이용하며 발생할 수 있는 Self Invocation 문제에 대해 알아보았다. 그리고 몇 가지 해결 방법들을 알아보았는데, 가장 좋은 해결 방법은 Self Invocation 상황이 발생하지 않게 좋은 구조로 코드를 작성하는 것이라고 생각한다.